---
title: "Distributing R packages with a drat repository hosted on AWS S3"
author: "Thomas Sandmann"
date: "2023-01-21"
freeze: true
categories: [R, AWS, TIL]
editor:
markdown:
wrap: 72
format:
html:
toc: true
toc-depth: 4
code-tools:
source: true
toggle: false
caption: none
editor_options:
chunk_output_type: console
---
```{bash}
#| echo: false
#| results: hide
#| eval: false
aws s3 rm --recursive s3://drat-tutorial/
```
```{bash}
#| echo: false
#| results: hide
rm -rf ~/drat-tutorial
```
## tl;dr
Today I learned how to
- Build an R package into source and binary bundles for distribution.
- Create a local drat repository.
- Add an R package to the repository and install it from there.
- Host the repository remotely in an AWS S3 bucket.
Many thanks to [Dirk Eddelbuettel](https://dirk.eddelbuettel.com/) for creating
and documenting the [drat R package](https://cran.r-project.org/package=drat)!
(As always, any mistakes are my own.)
### Motivation
There are multiple ways for developers to share R packages publicly,
e.g.
- Submit them to the [The Comprehensive R Archive Network
(CRAN)](https://cran.r-project.org/),
- Contribute them to the [Bioconductor](https://www.bioconductor.org/)
project,
- Publish them via [rOpenSci's
R-universe](https://ropensci.org/r-universe/)
User can then install these packages via the familiar `install.packages()`
command.
Alternatively, authors can share their code through version control systems
like [github](https://github.com/) or [gitlab](https://about.gitlab.com/),
and users can install them with third-party tools e.g.
[the remotes R package](https://cran.r-project.org/package=remotes).
But **how can you make an R package available privately**, e.g. for use
within an organization?
In this tutorial, I demonstrate how to set up your own package repository with
[Dirk Eddelbuettel's](https://dirk.eddelbuettel.com/)
[drat R package](https://cran.r-project.org/package=drat),
add a package, make R aware of the new repo - and host it remotely on AWS S3.
### Why drat?
Dirk Eddelbuettel [highlights two main
advantages:](https://eddelbuettel.github.io/drat/vignettes/dratfaq/)
- A package installed from a drat repository will be supported by
`install.packages()` and `update.packages()`, so the user has easy
methods for keeping up-to-date.
- The package author has better control over the package version users
install, because they actively push specific releases into the
repository.
[Please see Dirk's Drat
FAQ's](https://eddelbuettel.github.io/drat/vignettes/dratfaq/) for
additional points, e.g. ['Why could install_github be
wrong?'](https://eddelbuettel.github.io/drat/vignettes/dratfaq/#why-could-install_github-be-wrong)
### Prequisites
Hadley Wickham and Jenny Bryan have documented how to author, document
and build R packages in their freely-available [R Packages
book](https://r-pkgs.org/). In this walkthrough I am using Mac OS X
(v13.1), but you can find instructions to set up Windows or Linux build
environments in their [R build
toolchain](https://r-pkgs.org/setup.html#setup-tools) chapter.
### Bundling an R package's source code for distribution
First, we need an R package that's ready for distribution. Here, I am using the
`toy` R package
[that you can retrieve from github](https://github.com/tomsing1/toy),
either via
`git clone https://github.com/tomsing1/toy` or by downloading its source
code as a
[zip file](https://github.com/tomsing1/toy/archive/refs/heads/main.zip).
(Feel free to follow along with another R package instead - as long as
you have the
[source package](https://r-pkgs.org/structure.html#sec-source-package),
the following steps apply.)
Next, we
[bundle the package](https://r-pkgs.org/structure.html#sec-bundled-package)
into a single compressed file with the `.tar.gz` file extension. Let's
download the `.zip` file linked above into the `~/Downloads` folder and use the
`R CMD build` command to create a _source bundle_ [^1]:
[^1]: Alternatively, you can also create the bundle from within R using
the
[devtools::build()](https://devtools.r-lib.org/reference/build.html)
command.
```{bash}
cd ~/Downloads
curl -s -L -O https://github.com/tomsing1/toy/archive/refs/heads/main.zip
unzip -o -q main.zip
rm main.zip
R CMD build --force toy-main
```
We now have the `toy_0.1.0.tar.gz` file, ready to be inserted into a new
(or existing) drat repository.
### Creating a local drat repository
To create a new repository, we start by installing the [drat R
package](https://cran.r-project.org/package=drat) itself (if it's not
available on your system already) with the following R commands:
```{r}
if (!requireNamespace("drat", quietly = TRUE)) {
  install.packages("drat")
}
library(drat)
```
You can specify the path of your drat repository either by setting the
`dratRepo` option [^2]:
[^2]: You might want to add this option to your
[.Rprofile](https://rstats.wtf/r-startup.html#rprofile) file.
```{r}
options(dratRepo = "~/drat-tutorial")
getOption("dratRepo")
```
or by providing it as an argument to the `drat::insertPackage()`
function (see below).
Let's create a new drat repository in our home directory [^3], and
populate it with a minimal `index.html` file (to avoid
`HTTP 404 Not Found` errors later).
[^3]: Of course, you can place it anywhere you like, including e.g.
network drives, as long as you can write to the directory. If you
are using Windows, please remember to use backward instead of
forward slashes in your paths.
```{r}
dir.create("~/drat-tutorial", showWarnings = FALSE)
writeLines(
  text = "<!doctype html><title>My awesome drat repository!</title>",
  con = "~/drat-tutorial/index.html"
)
```
Now we are ready to insert the `toy` package bundle into the repository
with drat's `insertPackage()` command [^4]:
[^4]: In this tutorial, I use the `::` notation to highlight which
package a function originates from. Because we attached the package
with the `library(drat)` command before, the `drat::` prefix could
be omitted.
```{r}
drat::insertPackage(file = "~/Downloads/toy_0.1.0.tar.gz",
                    repodir = "~/drat-tutorial")
```
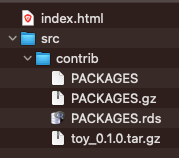
Now, the `~/drat-tutorial` folder contains the following files:
### Accessing the local drat repository
When you prompt your R installation to install or update R packages, it
searches repositories specified in the `repos` option. On my system,
only the default repository is set in a fresh R session [^5]:
[^5]: In this tutorial, I use the `::` notation to highlight in which
package functions originate from. Because we attached the package
with the `library(drat)` command before, the `drat::` prefix could
be omitted.
```{r}
getOption("repos")
```
If I try to install our example `toy` R package, I don't succeed:
```{r}
install.packages("toy", type = "source")
```
because R is not aware of our new repository, yet.
::: callout-note
### Installing from source
At this point, we must add the `type="source"` argument, because we have
only added the *source* bundle to the repository. We will add a compiled
version in a moment - read on!
:::
To test our local repository, we add its path to the list of known
repositories.
```{r}
drat::addRepo("LocalRepo", "file://Users/sandmann/drat-tutorial")
getOption("repos")
```
::: callout-important
### Specifying file:// paths
By default, drat's `addRepo()` command assumes that repositories are
hosted on [github-pages](https://pages.github.com/). Because we want to
access a repo via the filesystem (either locally or on a network drive),
we need to explicitly add the `file:/` prefix - and use the absolute
file path (e.g. returned by `path.expand("~/drat-tutorial")`) to specify its
location.
In this case, concatenating `file:/` with `/Users/sandmann/drat-tutorial`
produces the final `file://Users/sandmann/drat-tutorial` location (note the
double forward slashes).
:::
Now, we can install it with the usual `install.packages()` command [^6]:
[^6]: If you use Bioconductor, the `BiocManager::repositories()`
specifies additional repositories that host its annotation and
software packages.
```{r}
install.packages("toy", type = "source")
```
Great! We have successfully installed our `toy` R package from our brand
new repository. Now it is time to make it available to other users as
well.
### Building binary packages
Windows and Mac users who install packages from
[CRAN](https://cran.r-project.org/)
or any user installing files from the
[Posit Public Package Manager (PPPM)](https://packagemanager.rstudio.com/client/#/)
will usually receive
[a binary package](https://r-pkgs.org/Structure.html#sec-structure-binary).
CRAN accepts package bundles and creates the platform-specific binary file for
distribution. To offer the same service to users of our drat repository, we
need to compile the binary package ourselves.
Here, I create the Mac OS binary package from the bundle we obtained above
by executing the following command on my Mac OS operating system:
```{bash}
cd ~/Downloads
R CMD INSTALL --build toy_0.1.0.tar.gz
```
This command will first install the package into my default R library, and then
create the binary `toy_0.1.0.tgz` file.
Next, we add it to our local drat repository (note the `.tgz` file suffix).
```{r}
drat::insertPackage(file = "~/Downloads/toy_0.1.0.tgz",
                    repodir = "~/drat-tutorial")
```
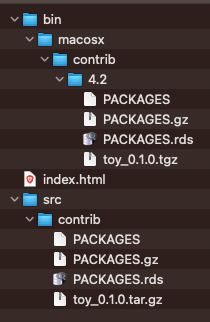
Now, the `~/drat-tutorial` folder contains a new subdirectory (`bin`) with the
binary files for Mac OS X:
At long last, now we can omit the `type="source"` argument from calls to
`install.packages()`:
```{r}
install.packages("toy")
```
## Hosting your drat repository on AWS S3
drat repositories can be hosted in any location
1. that you can write files to and
2. that can serve files via http
But unless you placed your drat repository into a network drive that is
accessible by multiple users, it is currently only useful to yourself.
::: {.callout-note collapse="true"}
### Sharing repository over a local network
If you chose a network drive as the location of your drat repository,
then other user can benefit from it right - as long as they can read from the
shared directory. As before, the absolute path must be prefixed with the
`file:/` prefix. For example, a repository that is available on *the user's*
systems at `/nfs/groups/groupABC/R/drat` would be added to the list of R
repositories via
`drat::addRepo("workgroup", "file://nfs/groups/groupABC/R/drat")`.
:::
The [drat
documentation](https://eddelbuettel.github.io/drat/vignettes/dratforusers/#case-1-using-github)
illustrates how you can use [git](https://git-scm.com/) and [github
pages](https://pages.github.com/) to make your repository *publicly*
available.
Here, we are interested in hosting a repository *privately* instead,
e.g. in a location that is only accessible from within our own
organization:
- If you already have access to a private server that serves files
to your users (e.g. via HTTP), then you can simply copy your repository there.
- If your organization uses Amazon Web Services (AWS), you can also use an
[S3 bucket to host your repository](https://docs.aws.amazon.com/AmazonS3/latest/userguide/WebsiteHosting.html)
and take advantage of the access controls set by your organization.
::: {.callout-note collapse="true"}
### Public repositories in S3 buckets
Although this use case focuses on hosting private repositories, you can of
course also make repositories in S3 buckets publicly available. Alas,
data storage in S3 buckets incurs cost, while other options (e.g. github-pages,
CRAN, Bioconductor, etc) are free, so this might not be your preferred option.
:::
We will assume that you have write access to an S3 bucket that is
configured to serve static files via HTTP. (For a brief outline of the
necessary steps, please
[see the appendix]((#creating-and-configuring-an-s3-bucket-to-host-static-files))
).
Here, I am using a bucket called `drat-tutorial` - but you should create /
access your own bucket to follow along.
::: callout-warning
AWS S3 buckets can be configured to either be visible publicly, or
access can be restricted to specific IP addresses, security groups or
other AWS resources. Please make sure you have configured your bucket in
a way that suits your needs.
S3 buckets do *not* support the [HTTPS
protocol](https://en.wikipedia.org/wiki/HTTPS). If you require an
encrypted file transfer, you might need a [different
solution](https://aws.amazon.com/premiumsupport/knowledge-center/cloudfront-https-requests-s3/).
:::
To share our repository, we must first copy its folder to the S3 bucket, either
via the AWS Console or (more conveniently) with the
[aws command line interface](https://aws.amazon.com/cli/)[^7]. (If you are
adventurous, you can also mount an S3 bucket as a _filey_ system with
[goofys](https://github.com/kahing/goofys)).
[^7]: [Installation instructions](https://docs.aws.amazon.com/cli/latest/userguide/getting-started-install.html).
Assuming you have set
[the necessary AWS credentials](https://docs.aws.amazon.com/cli/latest/userguide/cli-configure-files.html),
the following `aws s3 sync` command copies our repository to the `repo` folder
within `drat-tutorial` bucket that I [created in the `us-west-1` AWS region](#creating-and-configuring-an-s3-bucket-to-host-static-files).
```{bash}
#| results: hide
#| eval: false
aws s3 sync ~/drat-tutorial s3://drat-tutorial/repo
```
We can use the `aws s3 ls` command to confirm the upload:
```{bash}
#| eval: false
aws s3 ls s3://drat-tutorial/repo/
```
::: {.callout-note}
Whenever we make changes to our local repository, e.g. after adding new packages
or package versions, we have to rerun the `aws s3 sync` command to copy the
new files to the S3 bucket.
:::
Now that the files are in place, we can add our remote repository to the the
list of R repositories in our R session. First, we remove the `LocalRepo`
repository that we had added earlier, which points to the folder on our
local filesystem.
```{r}
options(repos = getOption("repos")[
  setdiff(names(getOption("repos")), "LocalRepo")
])
```
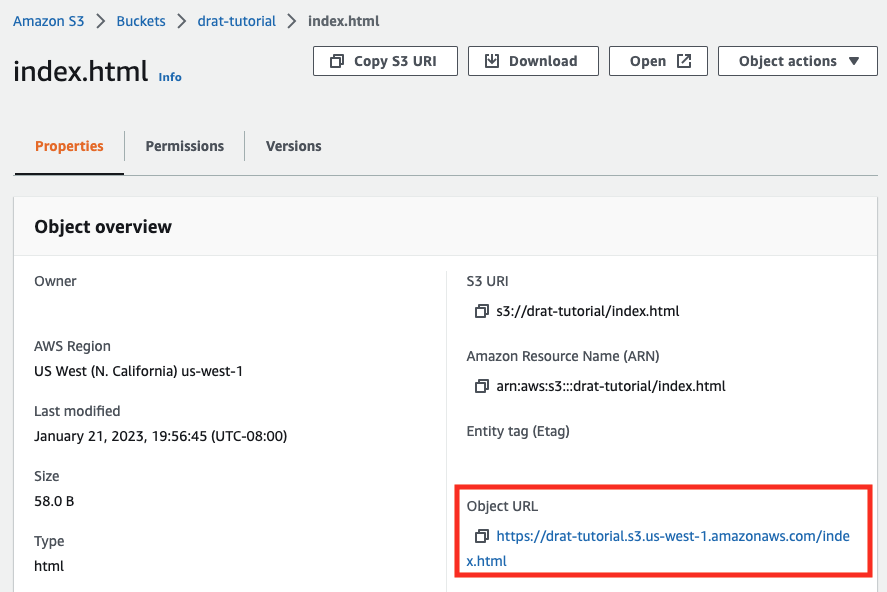
The we add the remote repository instead, by pointing to the URL of the
S3 bucket [^8].
[^8]: You can look up the URL for your bucket in the AWS S3 console:
```{r}
#| eval: false
drat::addRepo("S3repo", "http://drat-tutorial.s3.us-west-1.amazonaws.com/repo/")
getOption("repos")
```
Let's try to install the `toy` package from our S3 drat repository:
```{r}
#| eval: false
install.packages("toy")
```
Success! R has successfully connected to the remote repository and installed
the (binary) R package.
## Conclusions
- The `drat` R package makes it extremely simple to create a CRAN-like
repository.
- The static files can be served via HTTP, making it straightforward to host
the repository e.g. in an AWS S3 bucket with a restrictive access policy.
## Appendix
### Creating and configuring an S3 bucket to host static files
The following steps briefly outline how to create and configure an S3
bucket to act as a static web server via the AWS web interface (e.g. the
AWS Console). For more details, please read the [AWS S3
documentation](https://docs.aws.amazon.com/AmazonS3/latest/userguide/WebsiteHosting.html)
and / or consult your local AWS expert.
::: {.callout-warning}
Storing files on AWS S3 is not free. In this tutorial, we only upload a limited
number of small files, but please don't forget to purge them from your AWS
account afterward.
:::
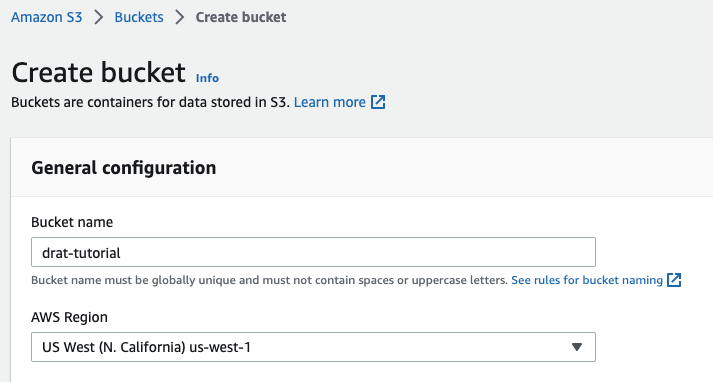
1. Create a new bucket (skip if you already have one)
- Make sure you create the bucket in the `region` that works best for
your organization (e.g. `us-west-1` if you want to host your files
in California).
- You do *not* need to enable `public access`, stick to the defaults
for your organization.
2. Next, navigate to your bucket's properties,
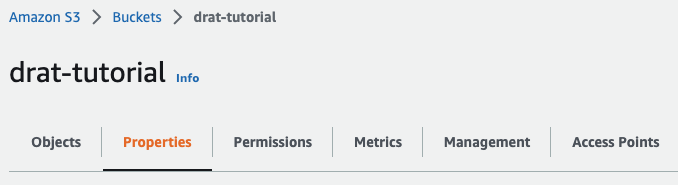
scroll all the way to the bottom of the page and
[enable Static website hosting](https://docs.aws.amazon.com/AmazonS3/latest/userguide/HostingWebsiteOnS3Setup.html#step2-create-bucket-config-as-website).
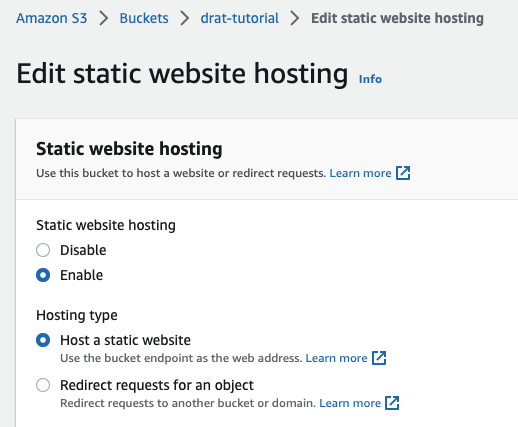
(Typically) specify `index.html` as the
`Index document`.

3. Under the `Permissions` tab, add a bucket policy that makes your
content available _within_ your organization
::: {.callout-warning}
These settings determine who can access your files. Proceed with
caution to
[avoid inadvertently exposing your data to the world!](https://www.trendmicro.com/vinfo/pl/security/news/virtualization-and-cloud/data-on-123-million-us-households-exposed-due-to-misconfigured-aws-s3-bucket)
:::
For example, the following policy grants read access to all files in the
`s3://drat-tutorial/` bucket to requests originating (only) from the
`192.0.2.0` IP address. (Your own configuration will be different, of
course.)
```json
{
  "Version": "2012-10-17",
  "Statement": [
    {
      "Sid": "PublicReadGetObject",
      "Effect": "Allow",
      "Principal": "*",
      "Action": [
        "s3:GetObject"
      ],
      "Resource": [
        "arn:aws:s3:::drat-tutorial/*"
      ],
      "Condition": {
        "IpAddress": {
          "aws:SourceIp": "192.0.2.0/32"
        }
      }
    }
  ]
}
```


